Friday, October 6, 2023

Image Size — Width and Height

  Image Size-Width and Height

You can use the style attribute to specify the width and height of an image.
You can use the style attribute to specify the width and height of an image.

Example

<!DOCTYPE html>
<html>
<body>

<h2>Image Size</h2>

<p>Here we use the style attribute to specify the width and height of an image:</p>

<img src="images/chapati.jpeg" alt="chapati" style="width:500px; height:300px;">

</body>
</html>

A new webpage opens with image that we have selected with the specified height and width

Height and Width

Alternatively, you can use the width and height attributes:

Example:

<!DOCTYPE html>
<html>
<body>

<h2>Image Size</h2>

<p>Here we specify the width and height of an image with the width and height attributes:</p>

<img src="images/Icecream.jpg" alt="Ice Cream" width="500" height="600">

</body>
</html>

A new webpage opens with image that we have selected with the specified height and width attributes:

Images in Another Folder

If you have your images in a sub-folder, you must include the folder name in the src attribute:

Example

<!DOCTYPE html>
<html>
<head>
<title>Image</title>
</head>
<body>
<img src="images/nature.jpeg" alt="nature" width="200" height="200">
</body>
</html>

A new webpage opens with image which is located in the sub folder

Animated Images

HTML allows animated GIFs:

Example

<!DOCTYPE html>
<html>
<head>
<title>
Dog
</title>
</head>

<body>
<p>The alt attribute should reflect the image content, so users who cannot see the image get an understanding of what the image contains:</p>
<img src="images/cutedog.gif"
alt="cute dog" width="200">


</body>
</html>

A new webpage opens with animated image :

As it is screenshot you can not see that the image is moving but you can see it once you use the above code

Image Floating

Use the CSS float property to let the image float to the right or to the left of a text:

Example

<!DOCTYPE html>
<html>
<body>

<h2>Floating Images</h2>
<p><strong>Float the image to the right:</strong></p>

<p>
<img src="images/dog.jfif" alt="cute dog" style="float:right;width:42px;height:42px;">
A paragraph with a floating image. A paragraph with a floating image. A paragraph with a floating image.
</p>

<p><strong>Float the image to the left:</strong></p>
<p>
<img src="images/dog.jfif" alt="cute dog" style="float:left;width:42px;height:42px;">
A paragraph with a floating image. A paragraph with a floating image. A paragraph with a floating image.
</p>

</body>
</html>

Thursday, October 5, 2023

HTML Images

                                      HTML Images

Images can improve the design and the appearance of a web page.

FOR Example:

<!DOCTYPE html>
<html>
<head>
<title>
Dog
</title>
</head>

<body>
<p>The alt attribute should reflect the image content, so users who cannot see the image get an understanding of what the image contains:</p>
<img src="images/cutedog.gif"
alt="cute dog" width="200">


</body>
</html>

A new webpage opens with the image that has been selected as above:

HTML Images Syntax

The HTML <img> tag is used to embed an image in a web page.

Images are not technically inserted into a web page; images are linked to web pages. The <img> tag creates a holding space for the referenced image.

The <img> tag is empty, it contains attributes only, and does not have a closing tag.

The <img> tag has two required attributes:

  • src — Specifies the path to the image
  • alt — Specifies an alternate text for the image

Syntax

<img src="url" alt="alternatetext">

The src Attribute

The required src attribute specifies the path (URL) to the image.

Note: When a web page loads, it is the browser, at that moment, that gets the image from a web server and inserts it into the page. Therefore, make sure that the image actually stays in the same spot in relation to the web page, otherwise your visitors will get a broken link icon. The broken link icon and the alt text are shown if the browser cannot find the image.

Example

<!DOCTYPE html>
<html>
<head>
<title>Image</title>
</head>
<body>
<img src="images/nature.jpeg" alt="nature" width="200" height="200">
</body>
</html>

A new webpage opens with the nature image that has been inserted as above:

The alt Attribute

The required alt attribute provides an alternate text for an image, if the user for some reason cannot view it (because of slow connection, an error in the src attribute, or if the user uses a screen reader).

The value of the alt attribute should describe the image:

Example

<!DOCTYPE html>
<html>
<body>

<h2>Alternative text</h2>

<p>The alt attribute should reflect the image content, so users who cannot see the image get an understanding of what the image contains:</p>

<img src="images/Icecream.jpg" alt="IceCream" width="460" height="345">

</body>
</html>

A new webpage opens image with the alternative text as above:

Wednesday, October 4, 2023

HTML Links — Use an Image as a Link

 HTML Links — Use an Image as a Link

To use an image as a link, just put the <img> tag inside the <a> tag:

Example

<!DOCTYPE html>
<html>
<body>

<h2>Image as a Link</h2>

<p>The image below is a link. Try to click on it.</p>

<a href="https://google.com"><img src="images/dog.png" alt="cute dog"></a>

</body>
</html>

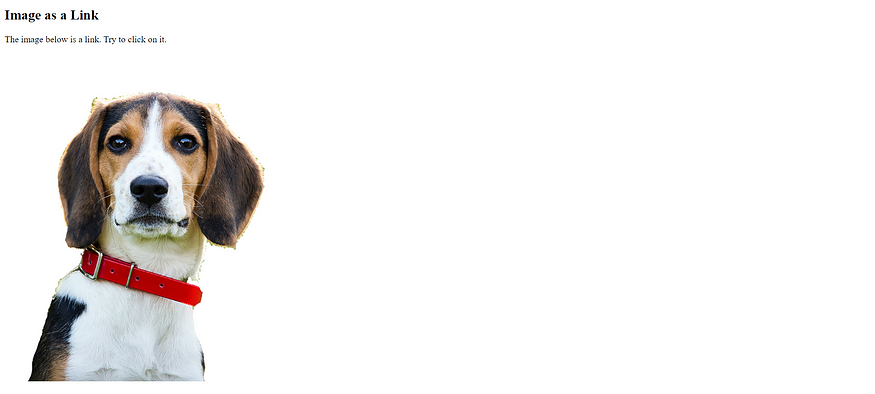
A new webpage opens with the dog picture and when you click on it you will be redirected to link:

Link to an Email Address

Use mailto: inside the href attribute to create a link that opens the user's email program (to let them send a new email):

Example

<!DOCTYPE html>
<html>
<body>

<h2>Link to an Email Address</h2>

<p>To create a link that opens in the user's email program (to let them send a new email), use mailto: inside the href attribute:</p>

<p><a href="abcd@example.com">Send email</a></p>

</body>
</html>

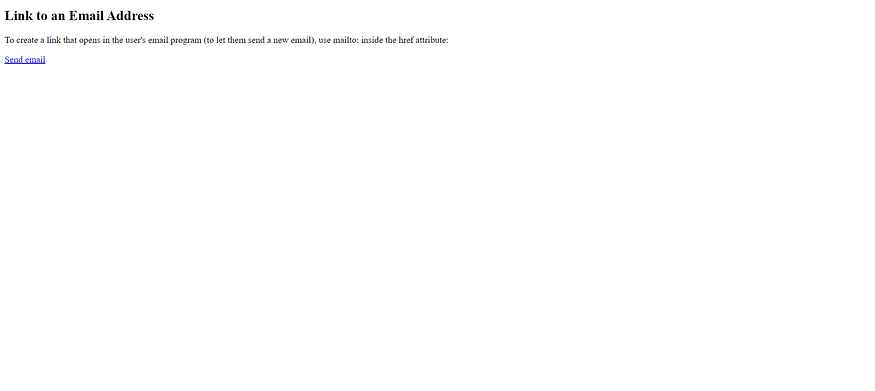
A new webpage is redirected by opening a mail:

Button as a Link

To use an HTML button as a link, you have to add some JavaScript code.

JavaScript allows you to specify what happens at certain events, such as a click of a button:

Example

<!DOCTYPE html>
<html>
<head>
<title>
button
</title>
</head>
<body>
<a href="https://www.youtube.com/watch?v=tDqTXipQmBU&list=PLZPZq0r_RZOOxqHgOzPyCzIl4AJjXbCYt&index=11">
<button style="font-size:25px; background-color:blue; color:white; border-radius:30px">click me</button>
</a>

<a href="https://www.google.com/">
<button style="font-size:30px; background-color:green; color:white; border-radius:40px ">
click me
</button>
</a>

<a href="https://www.google.com/">
<button style="font-size=20px; background-color:blue; color:white; border-radius:35px">
click me
</button>
</a>
</body>
</html>

A new webpage opens with the buttons colored and when you click on it you will be redirected to other websites:

Tuesday, October 3, 2023

HTML Links

                                         HTML Links

Links are found in nearly all web pages. Links allow users to click their way from page to page.

HTML Links — Hyperlinks

HTML links are hyperlinks.

You can click on a link and jump to another document.

When you move the mouse over a link, the mouse arrow will turn into a little hand.

HTML Links — Syntax

The HTML <a> tag defines a hyperlink. It has the following syntax:

<a href="url">click here</a>

The most important attribute of the <a> element is the href attribute, which indicates the link's destination.

The click here is the part that will be visible to the reader.

Clicking on the click here , will send the reader to the specified URL address.

Example

This example shows how to create a link:

<!DOCTYPE html>
<html>
<head>
<title>
My website

</title>

</head>
<body>

<a href="https://medium.com">
click me
</a>

<br>

<a href = "lyrics.html">
song lyrics
</a>

<br>

<a href="test@fake.com">
email me
</a>


</body>


</html>

This is how a new webpage opens with three hyperlinks:

Hyperlinks

By default, links will appear as follows in all browsers:

  • An unvisited link is underlined and blue
  • A visited link is underlined and purple
  • An active link is underlined and red

HTML Links — The target Attribute

By default, the linked page will be displayed in the current browser window. To change this, you must specify another target for the link.

The target attribute specifies where to open the linked document.

The target attribute can have one of the following values:

  • _self - Default. Opens the document in the same window/tab as it was clicked
  • _blank - Opens the document in a new window or tab
  • _parent - Opens the document in the parent frame
  • _top - Opens the document in the full body of the window

Example

Use target=”_blank” to open the linked document in a new browser window or tab:

<!DOCTYPE html>
<html>
<head>
<title>
My website

</title>

</head>
<body>

<a href="https://medium.com"
target ="_blank"
title = "Goes to google">

click me</a>

<br>
</body>
</html>

So, the new webpage opens after clicking on the hyperlink:

Building Static Website(part6) HTML Lists

  Building Static Website (part6) HTML Lists Today, let us add some lists to our detailed view section by using html lists. Lists: List is a...