HTML Table Styling

Use CSS to make your tables look better.
HTML Table — Zebra Stripes
If you add a background color on every other table row, you will get a nice zebra stripes effect.
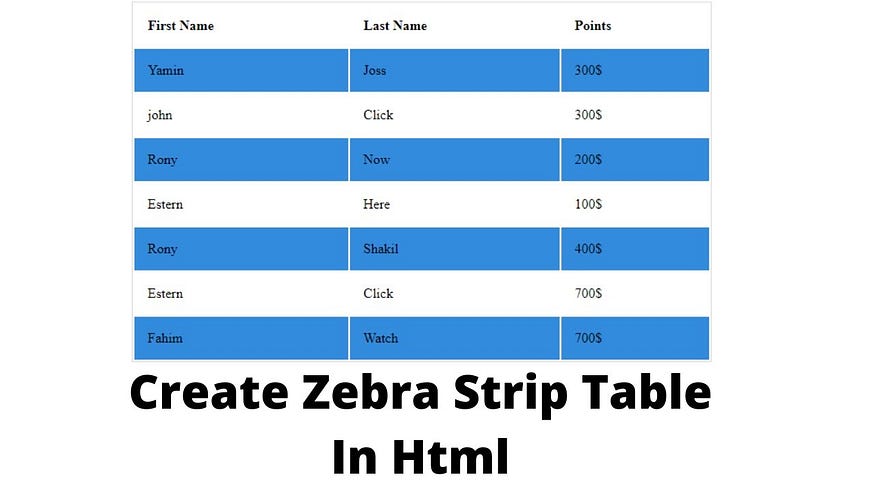
To style every other table row element, use the :nth-child(even) selector like this:
Example
<!DOCTYPE html>
<html>
<head>
<style>
table {
  border-collapse: collapse;
  width: 100%;
}

th, td {
  text-align: left;
  padding: 8px;
}

tr:nth-child(even) {
  background-color: #D6EEEE;
}
</style>
</head>
<body>

<h2>Zebra Striped Table</h2>
<p>For zebra-striped tables, use the nth-child() selector and add a background-color to all even (or odd) table rows:</p>

<table>
  <tr>
  <th>First Name</th>
  <th>Last Name</th>
  <th>Points</th>
  </tr>
  <tr>
  <td>ammu</td>
  <td>yerra</td>
  <td>rs 500</td>
  </tr>
  <tr>
  <td>babbu</td>
  <td>tumma</td>
  <td>rs 200</td>
  </tr>
  <tr>
  <td>harry</td>
  <td>reo</td>
  <td>$300</td>
  </tr>
  <tr>
  <td>priya</td>
  <td>black</td>
  <td>rs 300</td>
  </tr>
</table>

</body>
</html>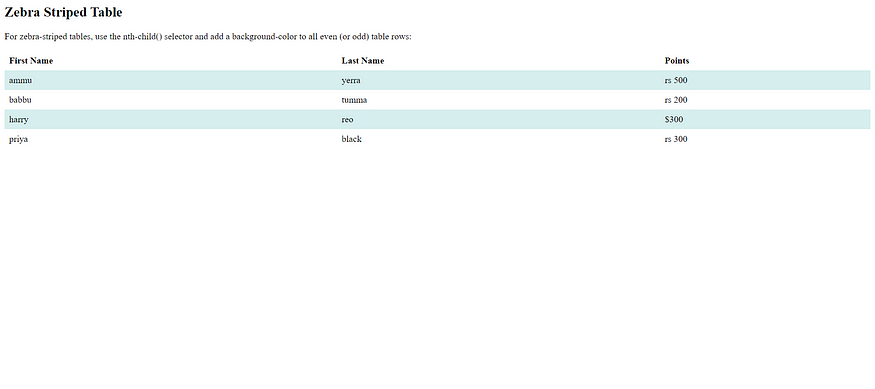
HTML Table — Vertical Zebra Stripes
To make vertical zebra stripes, style every other column, instead of every other row.
Set the :nth-child(odd) for table data elements like this:
Example
<!DOCTYPE html>
<html>
<head>
<style>
table, th, td {
  border: 1px solid black;
  border-collapse: collapse;
}

th:nth-child(even),td:nth-child(even) {
  background-color: hsl(180, 41%, 89%);
}
</style>
</head>
<body>

<h2>Striped Table</h2>
<p>For zebra-striped tables, use the nth-child() selector and add a background-color to all even (or odd) table rows:</p>

<table style="width:100%">
  <tr>
    <th>MON</th>
    <th>TUE</th>
    <th>WED</th>
    <th>THU</th>
    <th>FRI</th>
    <th>SAT</th>
    <th>SUN</th>
  </tr>
  <tr>
    <td> </td>
    <td> </td>
    <td> </td>
    <td> </td>
    <td> </td>
    <td> </td>
    <td> </td>
  </tr>
  <tr>
    <td> </td>
    <td> </td>
    <td> </td>
    <td> </td>
    <td> </td>
    <td> </td>
    <td> </td>
  </tr>
  <tr>
    <td> </td>
    <td> </td>
    <td> </td>
    <td> </td>
    <td> </td>
    <td> </td>
    <td> </td>
  </tr>
  <tr>
    <td> </td>
    <td> </td>
    <td> </td>
    <td> </td>
    <td> </td>
    <td> </td>
    <td> </td>
  </tr>
</table>

</body>
</html>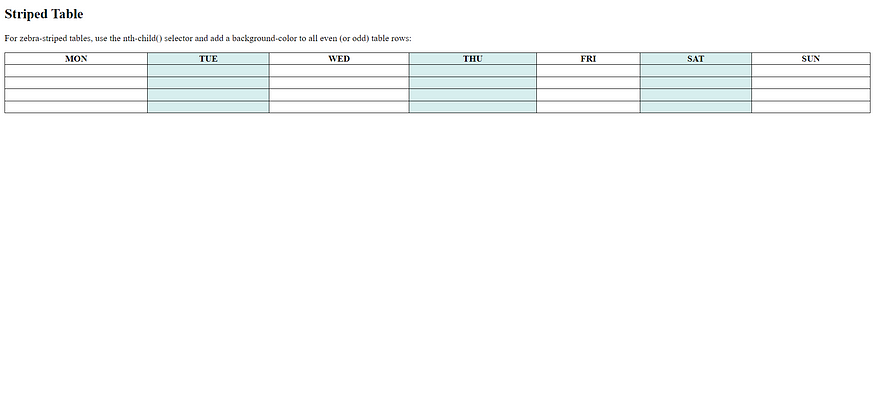
Combine Vertical and Horizontal Zebra Stripes
You can combine the styling from the two examples above and you will have stripes on every other row and every other column.
If you use a transparent color you will get an overlapping effect.
Use an rgba() color to specify the transparency of the color:
Example
<!DOCTYPE html>
<html>
<head>
<style>
table, th, td {
  border: 1px solid black;
  border-collapse: collapse;
}

tr:nth-child(even) {
  background-color: hsla(180, 77%, 74%, 0.4);
}

th:nth-child(even),td:nth-child(even) {
  background-color: hsla(180, 77%, 74%, 0.4);
}
</style>
</head>
<body>

<h2>Striped Table</h2>
<p>For zebra-striped tables, use the nth-child() selector and add a background-color to all even (or odd) table rows:</p>

<table style="width:100%">
  <tr>
    <th>MON</th>
    <th>TUE</th>
    <th>WED</th>
    <th>THU</th>
    <th>FRI</th>
    <th>SAT</th>
    <th>SUN</th>
  </tr>
  <tr>
    <td> </td>
    <td> </td>
    <td> </td>
    <td> </td>
    <td> </td>
    <td> </td>
    <td> </td>
  </tr>
  <tr>
    <td> </td>
    <td> </td>
    <td> </td>
    <td> </td>
    <td> </td>
    <td> </td>
    <td> </td>
  </tr>
  <tr>
    <td> </td>
    <td> </td>
    <td> </td>
    <td> </td>
    <td> </td>
    <td> </td>
    <td> </td>
  </tr>
  <tr>
    <td> </td>
    <td> </td>
    <td> </td>
    <td> </td>
    <td> </td>
    <td> </td>
    <td> </td>
  </tr>
</table>

</body>
</html>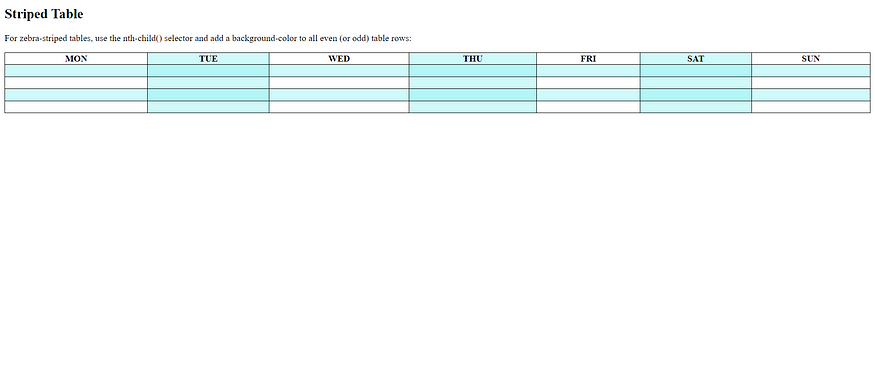
Horizontal Dividers
If you specify borders only at the bottom of each table row, you will have a table with horizontal dividers.
Add the border-bottom property to all tr elements to get horizontal dividers:
Example
<!DOCTYPE html>
<html>
<head>
<style>
table {
  border-collapse: collapse;
  width: 100%;
}

tr {
  border-bottom: 1px solid #ddd;
}
</style>
</head>
<body>

<h2>Bordered Table Dividers</h2>
<p>Add the border-bottom property to the tr elements for horizontal dividers:</p>

<table>
  <tr>
    <th>Firstname</th>
    <th>Lastname</th>
  <th>Savings</th>
  </tr>
  <tr>
    <td>xxx</td>
    <td>yyy</td>
    <td>rs1000</td>
  </tr>
  <tr>
    <td>aaa</td>
    <td>bbb</td>
    <td>rs1500</td>
  </tr>
  <tr>
    <td>ccc</td>
    <td>ddd</td>
    <td>rs3000</td>
  </tr>
  <tr>
    <td>ttt</td>
    <td>sss</td>
    <td>rs2500</td>
  </tr>
</table>

</body>
</html>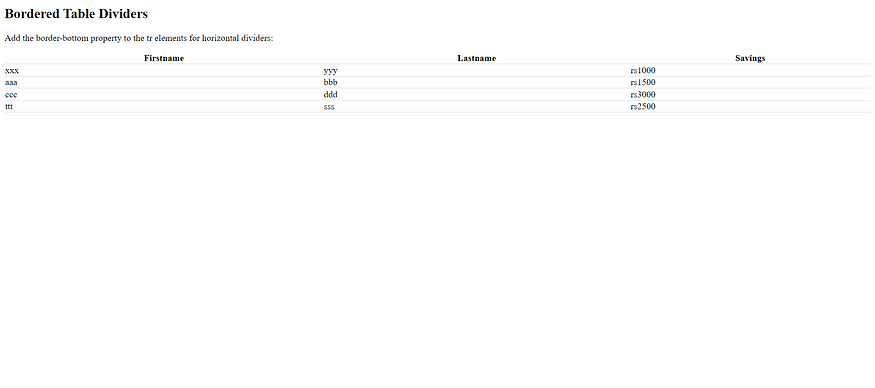
<!DOCTYPE html>
<html>
<head>
<style>
table {
  border-collapse: collapse;
  width: 100%;
}

th, td {
  padding: 8px;
  text-align: left;
  border-bottom: 1px solid #DDD;
}

tr:hover {background-color: #9eecec;}
</style>
</head>
<body>

<h2>Hoverable Table</h2>
<p>Move the mouse over the table rows to see the effect.</p>

<table>
  <tr>
    <th>First Name</th>
    <th>Last Name</th>
    <th>Points</th>
  </tr>
  <tr>
    <td>xxx</td>
    <td>yyy</td>
    <td>rs1000</td>
  </tr>
  <tr>
    <td>aaa</td>
    <td>bbb</td>
    <td>rs1500</td>
  </tr>
  <tr>
    <td>ccc</td>
    <td>ddd</td>
    <td>rs3000</td>
  </tr>
  <tr>
    <td>zzz</td>
    <td>www</td>
    <td>rs2500</td>
  </tr>
</table>

</body>
</html>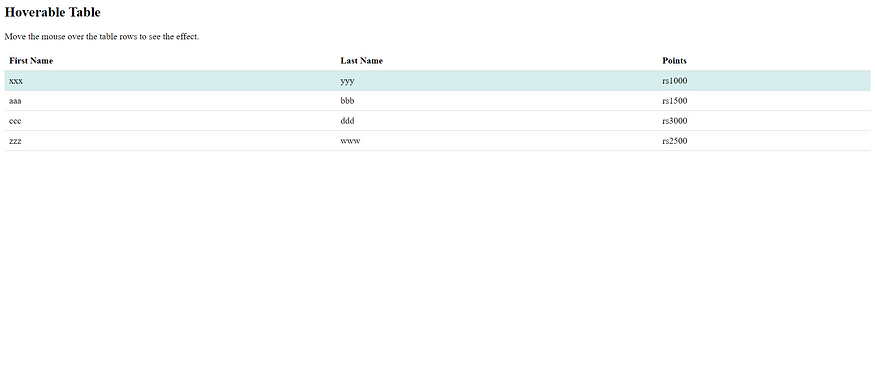

No comments:
Post a Comment