Tuesday, October 10, 2023

HTML Tables

                                         HTML Tables

HTML tables allow web developers to arrange data into rows and columns.

HTML Table Tags

Define an HTML Table

A table in HTML consists of table cells inside rows and columns.

Example

A simple HTML table:

<!DOCTYPE html>
<html>
<head>
<title>
tables
</title>
</head>
<body>
<h3>store hours</h3>

<table border="1" style="background-color:black">
<tr align="center" style="background-color:lightblue">
<th width="100">sunday</th>
<th width="100">monday</th>
<th width="100">tuesday</th>
<th width="100">wednesday</th>
<th width="100">thursday</th>
<th width="100">friday</th>
<th width="100">suturday</th>
</tr>
<tr align="center" style="background-color:white">
<td>closed</td>
<td>9-5</td>
<td>9-5</td>
<td>9-5</td>
<td>9-5</td>
<td>9-5</td>
<td>9-5</td>
</tr>

</table>

<h3>study hour</h3>

<table border="1" style="background-color:black">
<tr align="center" style="background-color:orange">
<th width="70">telugu</th>
<th width="70">hindi</th>
<th width="70">english</th>
<th width="70">maths</th>

</tr>
<tr align="center" style="background-color:white">
<td>9-10</td>
<td>10-11</td>
<td>11-12</td>
<td>12-1</td>
</tr>
</table>
</body>
</html>

Table Cells

Each table cell is defined by a <td> and a </td> tag.

td stands for table data.

Everything between <td> and </td> are the content of the table cell.

Example

<!DOCTYPE html>
<html>
<style>
table, th, td {
border:1px solid black;
}
</style>
<body>

<h2>TD elements define table cells</h2>

<table style="width:100%">
<tr>
<td>Telugu</td>
<td>Hindi</td>
<td>English</td>
</tr>
</table>

<p>To understand the example better, we have added borders to the table.</p>

</body>
</html>

Table Rows

Each table row starts with a <tr> and ends with a </tr> tag.

tr stands for table row.

Example

<html>
<style>
table, th, td {
border:1px solid black;
}
</style>
<body>

<h2>TR elements define table rows</h2>

<table style="width:100%">
<tr>
<td>Telugu</td>
<td>Hindi</td>
<td>English</td>
</tr>
<tr>
<td>16</td>
<td>14</td>
<td>10</td>
</tr>
</table>

<p>To understand the example better, we have added borders to the table.</p>

</body>
</html>

Table Headers

Sometimes you want your cells to be table header cells. In those cases use the <th> tag instead of the <td> tag:

th stands for table header.

Example

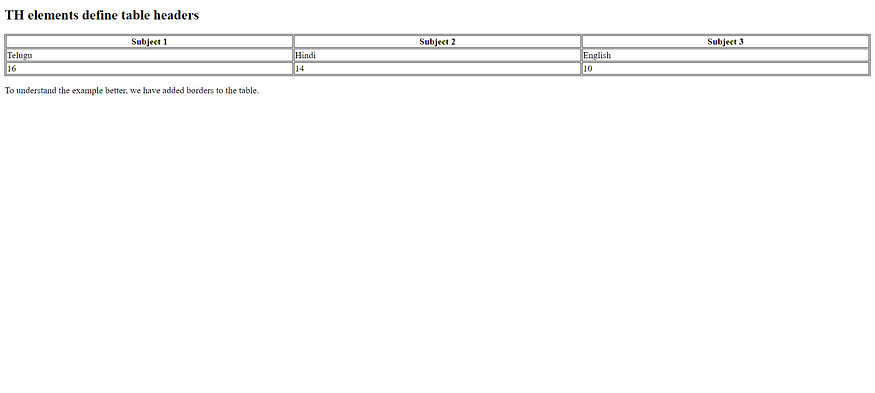
Let the first row be table header cells:

<!DOCTYPE html>
<html>
<style>
table, th, td {
border:1px solid black;
}
</style>
<body>

<h2>TH elements define table headers</h2>

<table style="width:100%">
<tr>
<th>Subject 1</th>
<th>Subject 2</th>
<th>Subject 3</th>
</tr>
<tr>
<td>Telugu</td>
<td>Hindi</td>
<td>English</td>
</tr>
<tr>
<td>16</td>
<td>14</td>
<td>10</td>
</tr>
</table>

<p>To understand the example better, we have added borders to the table.</p>

</body>
</html>
Monday, October 9, 2023

HTML Favicon and PAGE Title

HTML Favicon and PAGE Title

A favicon is a small image displayed next to the page title in the browser tab.

How To Add a Favicon in HTML

A favicon image is displayed to the left of the page title in the browser tab, like this:

To add a favicon to your website, either save your favicon image to the root directory of your webserver, or create a folder in the root directory called images, and save your favicon image in this folder. A common name for a favicon image is “favicon.ico”.

Next, add a <link> element to your "index.html" file, after the <title> element, like this:

Example

<!DOCTYPE html>
<html>
<head>
<link rel="icon" type="image/jpg" href="images/dog.png">
<title>icon</title>
</head>
<body>

</body>
</html>

Now, save the “index.html” file and reload it in your browser. Your browser tab should now display your favicon image to the left of the page title.

A favicon image is displayed at the top left as shown above

Favicon File Format Support

The following table shows the file format support for a favicon image:

HTML Page Title

Every web page should have a page title to describe the meaning of the page.

The <title> element adds a title to your page:

Example

<!DOCTYPE html>
<html>
<head>
<title>HTML Tutorial</title>
</head>
</html>

As you can see that is how the page title is display

Saturday, October 7, 2023

HTML Background Images

         HTML Background Images

A background image can be specified for almost any HTML element.

Background Image:

Example:

<!DOCTYPE html>
<html>
<head>
<style>
body {
background-image: url('images/mountain.jpeg');

}
</style>
</head>
<body>

<h1>Hii</h1>

</body>
</html>

A new webpage opens with the image inserted in the background:

Background Repeat

If the background image is smaller than the element, the image will repeat itself, horizontally and vertically, until it reaches the end of the element:

As we have seen that the images has been repeating, so now we will solve this issue below:

Example:

<!DOCTYPE html>
<html>
<head>
<style>
body {
background-image: url('images/mountain.jpeg');
}
</style>
</head>
<body>

<h2>Background Repeat</h2>

<p>By default, the background image will repeat itself if it is smaller than the element where it is specified, in this case the body element.</p>

</body>
</html>

</body>
</html>

To avoid the background image from repeating itself, set the background-repeat property to no-repeat.

Example

<!DOCTYPE html>
<html>
<head>
<style>
body {
background-image: url('images/mountain.jpeg');
background-repeat: no-repeat;

</style>
</head>
<body>

<h1>Hii</h1>

</body>
</html>

A new webpage opens with the image inserted in the background:

Background Cover

If you want the background image to cover the entire element, you can set the background-size property to cover.

Also, to make sure the entire element is always covered, set the background-attachment property to fixed:

This way, the background image will cover the entire element, with no stretching (the image will keep its original proportions):

Example

<!DOCTYPE html>
<html>
<head>
<style>
body {
background-image: url('images/mountain.jpeg');
background-attachment: fixed;
background-size: cover;
}
</style>
</head>
<body>

<h1>Hii</h1>

</body>
</html>

A new webpage opens with the full image inserted in the background:

Building Static Website(part6) HTML Lists

  Building Static Website (part6) HTML Lists Today, let us add some lists to our detailed view section by using html lists. Lists: List is a...